

How to Create and Set Up New VHD or VHDX File in Windows 10
VHD (Virtual Hard Disk) is a file format which represents a virtual hard disk drive (HDD). It may contain what is found on a physical HDD, such as disk partitions and a file system, which in turn can contain files and folders. It is typically used as the hard disk of a virtual machine.
VHDX is a Hyper-V virtual hard disk file format. VHDX has a much larger 64 TB storage capacity than the older VHD format 2TB limit. It also provides data corruption protection during power failures and optimizes structural alignments of dynamic and differencing disks to prevent performance degradation on new, large-sector physical disks.
You can choose to have a fixed size or dynamically expanding VHD or VHDX file.
- Fixed size = This type of disk provides better performance. The virtual hard disk file is allocated to its maximum size when the virtual hard disk is created.
- Dynamically expanding = This type of disk provides better use of physical storage space. The virtual hard disk file grows to its maximum size as data is written to the virtual hard disk.
Once you have the new .vhd or .vhdx file created and setup, you can copy or move it to any Windows 10 PC you want to mount it on.
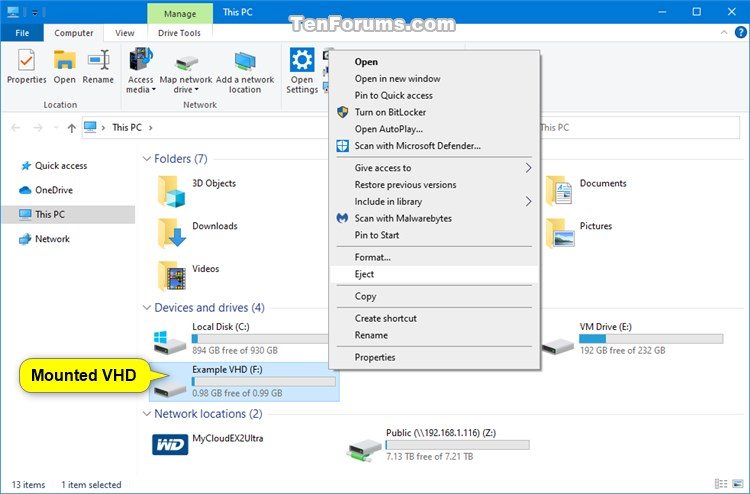
When you mount a .vhd or .vhdx file in Windows, it will be added as a drive in This PC to open it from.
This tutorial will show you how to create and set up (initialized and formatted) a new VHD and VHDX virtual hard disk file in Windows 10.
You must be signed in as an administrator to be able to create and set up a VHD and VHDX file.
Contents
- Option One: Create New VHD or VHDX file in Disk Management
- Option Two: Create New VHD or VHDX file in Hyper-V Manager
- Option Three: Create New VHD or VHDX file in PowerShell
- Option Four: Create New VHD or VHDX file in Command Prompt
- Option Five: Set Up New VHD or VHDX file in Disk Management
- Option Six: Set Up New VHD or VHDX file in Command Prompt or PowerShell
1 Open Disk Management (diskmgmt.msc).
2 Click/tap on Action in the menu bar, and click/tap on Create VHD. (see screenshot below)
3 Click/tap on the Browse button. (see screenshots below)
4 Navigate to and select and open the location (folder or drive) where you want to create and save the .vhd or .vhdx file at, type a file name you want, and click/tap on Save.
5 Enter a size (ex: "1 GB") you want for the virtual hard disk.
6 Select (dot) VHD or VHDX for what virtual hard disk format you want.
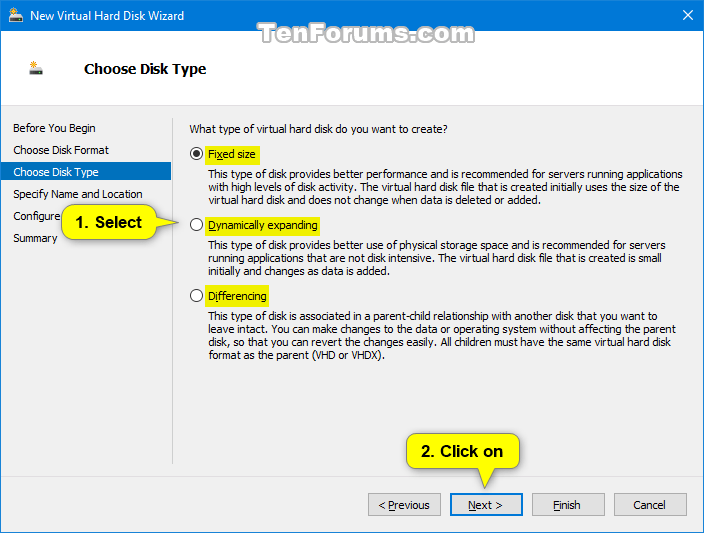
7 Select (dot) Fixed size or Dynamically expanding for the virtual hard disk type you want.
8 Click/tap on OK.
9 Do Option Five (Disk Management) or Option Six (command) for how you would like to set up this new .vhd or .vhdx file.
1 Open Hyper-V Manager (virtmgmt.msc).
2 Click/tap on a virtual machine server (ex: "BRINKW10DESKTOP") in the left pane, click/tap on New in the Actions right pane and click/tap on Hard Disk. (see screenshot below)
3 Click/tap on Next. (see screenshot below)
4 Select (dot) VHD or VHDX for what virtual hard disk format you want, and click/tap on Next. (see screenshot below)
5 Select (dot) Fixed size or Dynamically expanding for the virtual hard disk type you want, and click/tap on Next. (see screenshot below)
6 Enter a name you want for the .vhd or .vhdx file, browse to and select the location for where you want to create and save the .vhd or .vhdx file at, and click/tap on Next. (see screenshot below)
7 Select (dot) Create a new blank virtual hard disk, enter a size (ex: "1 GB") you want for the virtual hard disk, and click/tap on Next. (see screenshot below)
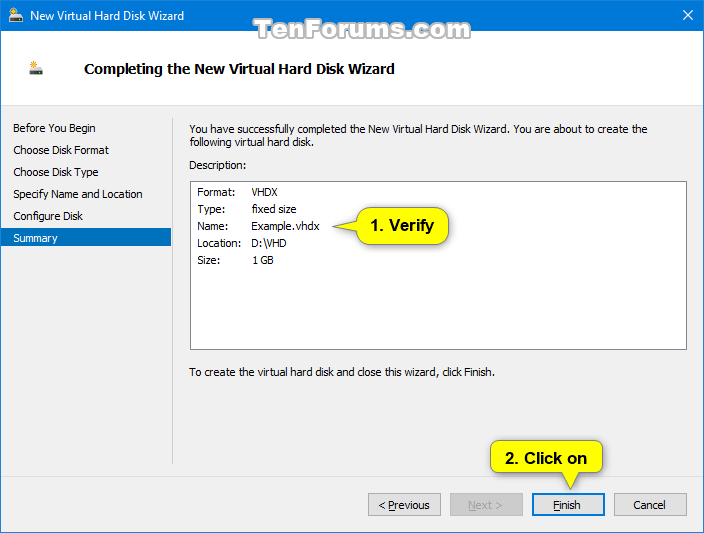
8 Verify everything is correct, and click/tap on Finish when ready. (see screenshot below)
9 Do Option Five (Disk Management) or Option Six (command) for how you would like to set up this new .vhd or .vhdx file.
For more details and usage options for the New-VHD cmdlet, see: New-VHD | Microsoft Docs
This command is only available after installing the Hyper-V Management Tools or Hyper-V feature.
1 Open an elevated PowerShell.
2 Type the command below for what type of .vhd or .vhdx file you want to create into the elevated PowerShell, and press Enter. (see screenshot below)
(create new fixed VHD or VHDX file)
New-VHD -Path "Full path of .vhd or .vhdx location" -Fixed -SizeBytes <size>
OR
(create new dynamic VHD or VHDX file)
New-VHD -Path "Full path of .vhd or .vhdx location" -Dynamic -SizeBytes <size>
Substitute Full path of .vhd or .vhdx file in the command above with the actual full path of the .vhd or .vhdx file for where you want to create and save it at.
Substitute <size> in the command above with the maximum size (ex: "1GB") you want for the .vhd or .vhdx file. This can be expressed as in MB, GB, or TB.
For example:New-VHD -Path "D:\VHD\Example.vhdx" -Fixed -SizeBytes 1GB
3 Do Option Five (Disk Management) or Option Six (command) for how you would like to set up this new .vhd or .vhdx file.
For more details and usage options for the create vdisk command, see: Create vdisk | Microsoft Docs
1 Open an elevated command prompt.
2 Typediskpartinto the elevated command prompt, and press Enter. (see screenshot below)
3 Type the command below for what type of .vhd or .vhdx file you want to create into the elevated command prompt, and press Enter.
(create new fixed VHD or VHDX file)
create vdisk file="Full path of .vhd or .vhdx location" maximum=<size> type=fixed
OR
(create new dynamic VHD or VHDX file)
create vdisk file="Full path of .vhd or .vhdx location" maximum=<size> type=expandable
Substitute Full path of .vhd or .vhdx file in the command above with the actual full path of the .vhd or .vhdx file for where you want to create and save it at.
Substitute <size> in the command above with the maximum size (ex: "1024") in megabytes (1GB = 1024MB) you want for the .vhd or .vhdx file.
For example:create vdisk file="D:\VHD\Example.vhdx" maximum=1024 type=fixed
4 Do Option Five (Disk Management) or Option Six (command) for how you would like to set up this new .vhd or .vhdx file.
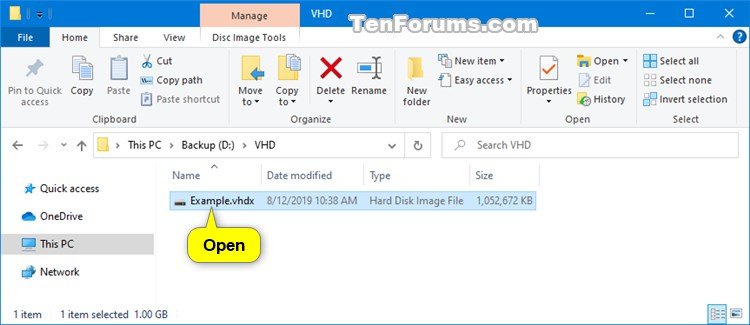
1 Open the new blank .vhd or .vhdx file created using Option One (Disk Management), Option Two (Hyper-V Manager), Option Three (PowerShell), or Option Four (command prompt). (see screenshot below)
This will add the new virtual hard disk as an unknown (not initialized) unallocated disk in Disk Management.
2 Click/tap on OK in the Couldn't Mount File error message. (see screenshot below)
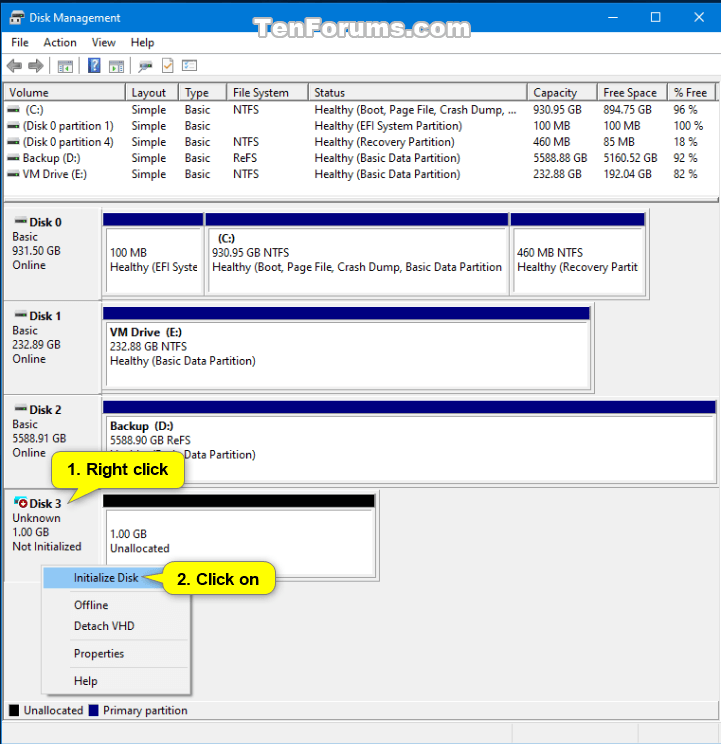
3 Open Disk Management (diskmgmt.msc).
4 Right click on the unknown disk (ex: "Disk 3") for the unallocated virtual hard disk, and click/tap on Initialize Disk. (see screenshot below)
5 In the Initialize Disk dialog, select (dot) MBR or GPT for the partition style you want for virtual hard disk, and click/tap on OK. (see screenshot below)
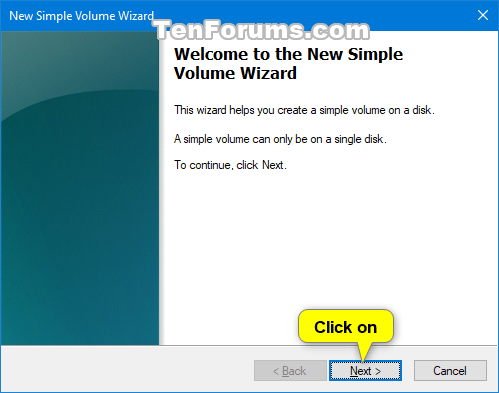
6 In the Disk Management, right click or press and hold on the unallocated disk for the virtual hard disk, and click/tap on New Simple Volume. (see screenshot below)
7 In the New Simple Volume Wizard dialog, click/tap on Next. (see screenshot below)
8 Make sure the Simple volume size is the same size as Maximum disk space (ex: 1021), and click/tap on Next. (see screenshot below)
9 Select (dot) Assign the following drive letter, select a drive letter (ex: "F") you want in the drop menu for the virtual hard disk, and click/tap on Next. (see screenshot below)
If you only want to set up the virtual hard disk without mounting it right now, you can select (dot) Do not assign a drive letter or drive path instead.
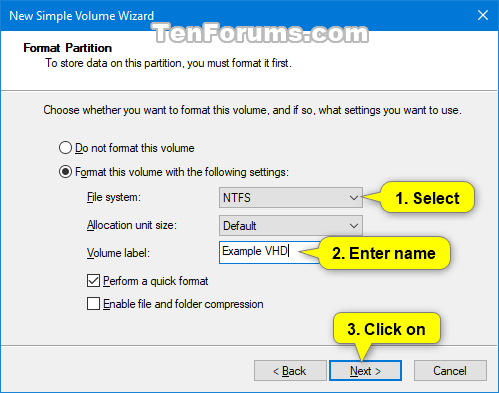
10 Select (dot) Format this volume with the following settings, select the file system (ex: NTFS) you want for the virtual hard disk, type a volume label (ex: "Example VHD") you want for the mounted virtual hard disk name, and click/tap on Next. (see screenshot below)
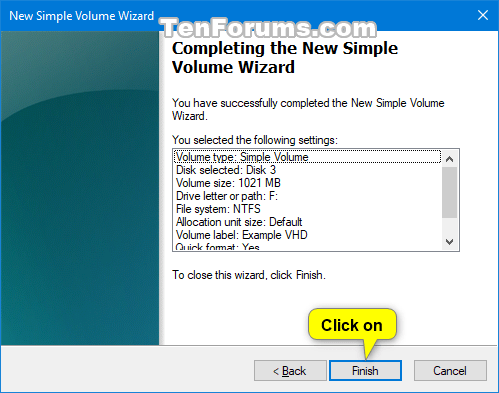
11 Click/tap on Finish. (see screenshot below)
12 You can now close Disk Management if you like. (see screenshot below)
13 You can now mount and unmount this .vhd or .vhdx file on any Windows 10 PC you like. (see screenshot below)
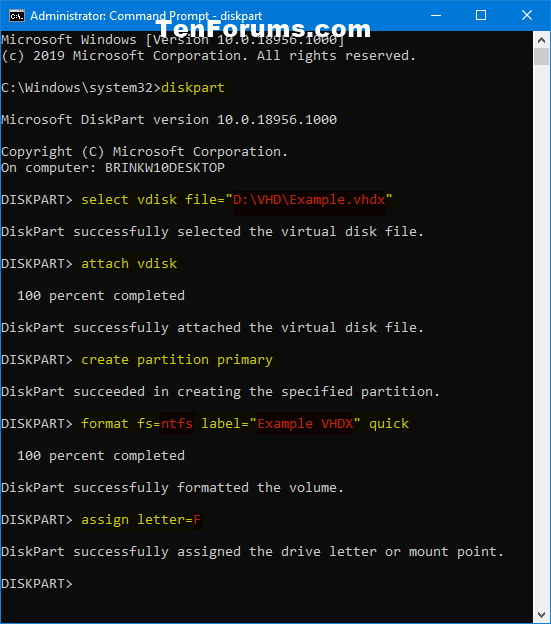
1 Open an elevated command prompt or elevated PowerShell console window.
2 Typediskpartinto the console window, and press Enter. (see screenshot below step 8)
3 Type the command below, and press Enter.
select vdisk file="Full path of .vhd or .vhdx location"
Substitute Full path of .vhd or .vhdx file in the command above with the actual full path of the .vhd or .vhdx file location.
For example:select vdisk file="D:\VHD\Example.vhdx"
4 Copy and pasteattach vdiskinto the console window, and press Enter.
5 Copy and pastecreate partition primaryinto the console window, and press Enter.
6 Type the command below for the file system and friendly name you want for the virtual hard disk, and press Enter.
(To format virtual hard disk with FAT file system)
format fs=FAT label="FriendlyName" quick
OR
(To format virtual hard disk with FAT32 file system)
format fs=FAT32 label="FriendlyName" quick
OR
(To format virtual hard disk with NTFS file system)
format fs=NTFS label="FriendlyName" quick
Substitute Friendly Name in the command above with what you want for the mounted virtual hard disk name.
For example:format fs=NTFS label="Example VHDX" quick
7 Type the command below for the drive letter you want assigned to the virtual hard disk, and press Enter.
(To let Windows automatically assign an available drive letter to virtual hard disk)
assign
OR
(To assign a specific drive letter to virtual hard disk)
assign letter=<Drive Letter>
Substitute <Drive Letter> in the command above with the actual drive letter (ex: "F") you want assigned to this mounted virtual hard disk.
For example:assign letter=F
8 You can now close the console window if you like. (see screenshot below)
9 You can now mount and unmount this .vhd or .vhdx file on any Windows 10 PC you like. (see screenshot below)
That's it,
Shawn
Related Tutorials
- How to Mount or Unmount VHD and VHDX File in Windows 10
- How to Create BitLocker Encrypted Container File with a VHD or VHDX File in Windows
- How to Auto-Mount VHD or VHDX File at Startup in Windows 10
Create and Set Up New VHD or VHDX File in Windows 10
-
New #1
One handy use for a virtual disk is to fool certain programs that don't want to work with external drives, such as flash drives.
As an example, when manipulating Windows images using the Microsoft DISM tool, it doesn't want to write to a flash drive. You could create a virtual disk on the flash drive and then tell DISM to use that virtual disk as the destination and it will work.
That may not be a great example as you would typically just use a HD, but it does illustrate the point of the trick .
.
Create and Set Up New VHD or VHDX File in Windows 10
How to Create and Set Up New VHD or VHDX File in Windows 10Published by Shawn BrinkCategory: Virtualization
23 Apr 2021


 Quote
QuoteTutorial Categories

Related Discussions
