What you need
-
-
Orient the laptop as seen in the picture with the battery facing you on the bottom right. To remove the main battery, first pull up on the tab with the arrow, then push away from you. You can now lift the battery out by pulling towards you and out. Set aside.
-
Using a #1 Phillips bit, unscrew the door to the RAM and CMOS battery compartment. This is a captive screw. Once unscrewed enough, open the door, tilting towards you. Remove and set aside.
-
Using a plastic spudger, pop the CMOS coin cell battery out of its holder by inserting the spudger under the battery in the notch on the front and pull up. Careful, this thing flies. Hunt it down on the floor or wherever it flew to and set aside.
-
Release the RAM by pressing the clips outward. The RAM chip will pop up and can be lifted out. Set aside.
-
-
-
Using a #1 Phillips bit, remove the two (2) 8mm screws from the front left.
-
Using a #1 Phillips bit, remove the two (2) 6mm screws from the right side in the battery well.
-
Using a #1 Phillips bit, remove the single (1) 25mm screw from the center.
-
Using a #1 Phillips bit, remove the two (2) 8mm screws from the middle left of the case.
-
-
-
-
Before removing the keyboard, using a Plastic Spudger to slide the keyboard towards you and away from the screen assembly.
-
Once the keyboard is loosened, carefully lift it up from the front.
-
Slide the safety clip to the side to release the keyboard.
-
Using a plastic spudger, gently release the bailers for all three (3) ribbon cables and slide them out.
-
You can now lift off the keyobard and set aside.
-
-
-
Turn the laptop so it faces away from you. Using a #1 Phillips bit, remove only the top screw from the left side.
-
Using a #1 Phillips bit, remove the two (2) 6mm screws securing the drive cage. Note: there may only be one depending on your model.
-
Using a #1 Phillips bit, remove the single (1) 6mm screw (special head) from the top left corner of the drive assembly.
-
Using a #1 Phillips bit, remove the 6mm screw from the front of the drive assembly.
-
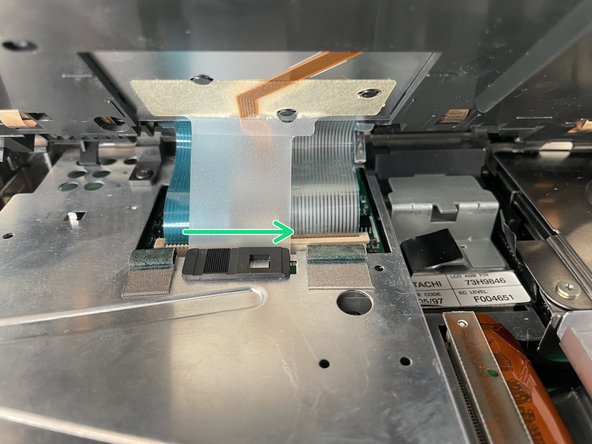
Using a plastic spudger, disconnect the ribbon cable in the center of the case attached to the drive assembly.
-
Carefully lift off the metal cage securing the drive assembly by lifting the left part and pulling outward. Set aside.
-
You are now able to remove the CD-ROM/FDD assembly. Be carefull that the laptop does not fall backwards when removing the assembly. Do this by tilting the left side up and sliding it out from the plastic case on the right side. Set aside.
-
-
-
Turn the laptop so the back is facing you.
-
Using a #1 Phillips bit, remove the two (2) 6mm screws above the serial port and left side of the printer port.
-
Turn the laptop back around and open the screen. Using a #1 Phillips bit, remove the silver screw from the bottom left of the top hard drive case.
-
Remove the hard drive top enclosure by pulling back toward you and lifting up and out.
-
Carefully slide the hard drive to the right. This may take a little force so be carefull not to damage the capacitors on the right.
-
Once the drive is disconnected from the IDE connector, lift the right side up and remove. Set asside or replace.
-


To reassemble your device, follow these instructions in reverse order.
To reassemble your device, follow these instructions in reverse order.
Cancel: I did not complete this guide.
4 other people completed this guide.

One Comment
Do you know how to fir that spring tensioner located in central left part of the picture showing internals after keyboard has been removed?