
Hello, everybody! I was looking at reviews of The Ten Commandments. This movie is one of my favorites, it’s the original movie that will make you pee at the seat because it’s too long! What many don’t realize is that this movie is a remake, a re-imagination of an earlier film with the same title. It was so good that people forgot about the original movie. This is rare because many remakes these days pale in comparison to the originals like Ghostbusters. It is such an entertaining film that I never get tired of watching it. Since we’re talking about remakes, I’ll show you a lens that’s a re-imagination of an old design, a modern remake of a real classic, and it’s better in many ways.
Introduction:
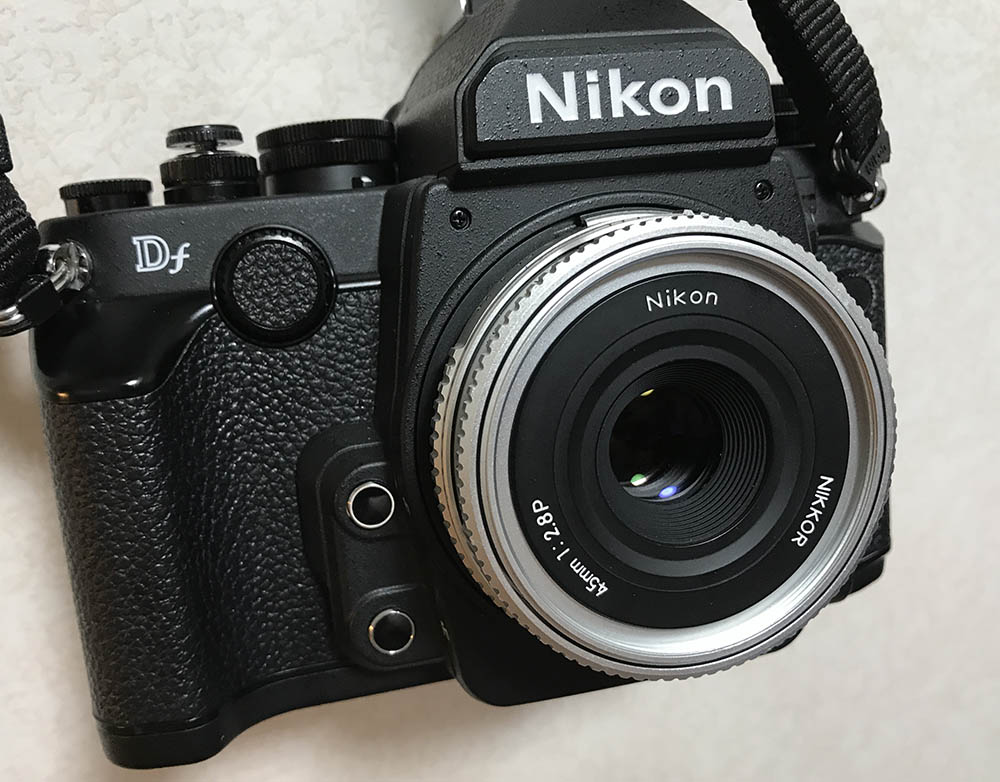
The Nikkor 45mm f/2.8 Ai-P is a modern take on a classic lens design. It was sold from 2001-2006 to compliment the Nikon FM3A. When this debuted, it kind of confused and excited the market since both it and the Nikon FM3A are re-imagination of old, manual equipment. People were used to seeing a new, modern design coming out each month at that time, but this? It has an appeal that and many people fell-in-love with this combo that they will not part with their setup. This was making a big statement, film isn’t dead. This was a time when people were selling all of their film cameras to buy digital cameras. Could it get any bolder? Hats-off to Nikon and the engineers!

It’s a really tiny lens, so-tiny that it can be annoying to use at times. Cameras with large, over-hanging prisms can be problematic since it can obstruct the view and you can’t see the aperture scale well. You can also get confused, its rings are so-thin and spaced closely-together you can accidentally turn any of them. These are sacrifices that we all have to make just so we can use the tiniest F-mount Nikkor.
The optical design is of the 4-elements-in-3-groups type, if that’s familiar to you then your guess may be right, it’s a Tessar-type lens. It’s the only Nikkor to be made in recent years to use such a design. Despite that, it doesn’t seem to have much of the character of a classic Tessar made during the old days. I could clearly see the high-resolution center and mediocre bokeh quality that are typical of Tessars but this one is more-refined in all aspects.

It’s sold to compliment the Nikon FM3A. Both are compact, the perfect setup for traveling. You’ll enjoy this kit a lot, it’s addicting.

It’s even-smaller than the GN-Nikkor 45mm f/2.8 Auto! This is the successor of the GN-Nikkor 45mm f/2.8 Auto despite not being made for use with flash. It does not have to be and the GN-Nikkor 45mm f/2.8 Auto is the only Nikkor to be made for it since TTL-metering made it obsolete.

It works really well with my Nikon Z6. It has electronics which makes this a compatible lens for use with the Nikon FTZ adapter. You can easily control it with a Nikon Z6 because of that.
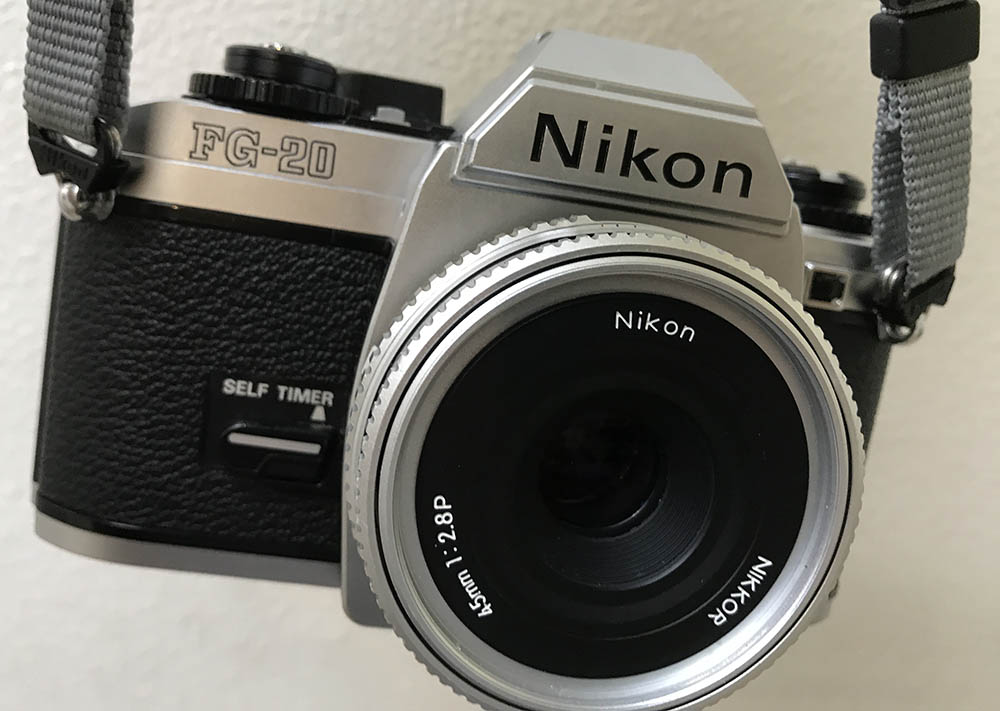
It’s tiny but the Nikon FG-20 is also tiny, too. This is an even-lighter kit, if you are worried about weight, this is the lightest setup that Nikon offers if I am correct. Well, maybe the Nikon 50mm f/1.8 Series-E is even lighter.
How about some sample photos? Knowing how your lens performs is key to maximizing it, you’ll know how to exploit its strengths and avoid its flaws. It will help you make a quick decision as to which lens to grab for a job. These photos were shot from f/2.8, f/4, f/5.6 and f/8. You’ll see the most change with these apertures and I imagine that these are the most common ones that the common user would want to use this with. I took these with a Nikon Df.


(Click to enlarge)
Vignetting can be observed wide-open which goes-away as you stop it down from f/4 and on. The distortion profile is quite unusual, I was expecting this to show a barrel-type profile but it has a shallow pincushion-type distortion profile which is more characteristic of longer lenses. I may be wrong so look at the photos and judge them for yourself.


(Click to enlarge)
The character and quality of the bokeh is sub-par, which is characteristic of the Tessar-type design. Consider this as a “feature” than a flaw, this is what a lot of lens aficionados will understand but some people may take this as a poor sign. The discs look clean and even wide-open which is good. Many old lenses of the same type perform poorly here. This is not a vintage lens but it honors the Tessar-tradition in this manner, if there’s such a thing.


(Click to enlarge)
Sharpness is quite good wide-open at the center, the corners look great, too. Of course, the center performs better than the corners, around a stop as far as I could tell. Chromatic aberration is quite strong wide-open. Resolution is very good and contrast looks amazing. Stopping the iris down to f/4 helps in improving sharpness, resolution is now higher which helps a lot. You’ll see a jump in performance at the corners but not as much as the center. You’re going to notice that chromatic aberration is now better-controlled but you’ll still artifacts at over-blown areas which doesn’t seem to go-away even if you stop the iris down to f/8, this is quite sad. The center is now near-peak when set to f/5.6 and the corners look better. Stopping this down to f/8 will merely deepen the depth-of-field and maybe improve corner sharpness but not by a lot. I don’t really see any point in stopping this beyond f/5.6 if sharpness is the only reason.
It could focus quite-close! This is a great feature which gives it greater value in terms of utility. You can use this to your advantage by taking detail shots at a wedding or when traveling. The high-performance center is going to be quite useful at closer distances as it gets amplified.

This is another photo of how high the performance is at the center at f/2.8. I got addicted shooting with this at this aperture since it just begs to be used at this aperture. The contrast and saturation are quite high, too.

Despite being a modern optic it does have a bit of a “vintage-feel” when this lens is used on certain scenarios.

The 45mm focal length is quite nice, it’s not too-wide but not too-tight. It’s a nice compromise between 35mm and 50mm. Some people would think that a 5mm difference won’t make a huge impact but it does.

It does not have much of a smooth focus-transition like most classic lenses have but it’s not abrupt either like what you’ll see in some modern lenses. It is somewhere in-between. It’s not ugly, it’s just not what you would expect from a classic lens (because it’s a modern lens).

Rendering is overall, quite bland. It does have a certain character but it isn’t what as you would expect from a classic Tessar. If you’re looking for that, a GN-Nikkor 45mm f/2.8 Auto is probably the lens for you.
(Click to enlarge)
Here are some more photos for you to look at. They’re unremarkable, quite boring to be honest but they will help give an idea of what this thing does. I love this lens a lot, it’s a classic lens design with a modern-twist.
Let’s now see some photos that were taken with film. Film has a unique feel thanks to grain and that makes it difficult to simulate with a digital camera. This lens was made during the digital era so it theoretically has to perform equally-well with both film and sensor. I took these with Fujifilm Industrial 100.

Resolution is very good. It’s sharp at the center and the contrast is high.

It’s a really-sharp lens with nice subject-isolation qualities. The quality of its bokeh is not the best but it’s not bad. Just zoom-in to the tiles at the roof, the corners and the grille and you will see what I mean.

It’s actually quite resistant to flaring and ghosts, specially with film but you will get problems with flare if you’re not careful. I took this intentionally to demonstrate this so you should be careful with positioning the lights in the frame to prevent this from happening to you.

Street photography is a nice application for this lens. The 45mm focal length is just-right for some people, it’s not as tight as a 50mm lens but it’s not wide like a 35mm. It gives you the right compression for some shots and you will get enough of the background within the frame.

The character of the bokeh isn’t the best. In fact, it’s sub-standard but this is not the focus of using this type of lens.

Sharpness is one of its strengths and you will appreciate its quality. Contrast is very high and the saturation is nice. This is a modern lens in anyway.


(Click to enlarge)
Here are plenty of photos for you to enjoy. These should give you an idea of just how useful this lens is and its amazing qualities. This is a great lens on film and digital, it won’t disappoint you.
I highly recommend this to anybody. This is a great lens for its size but the price is quite high for samples that are in great condition. I was lucky and I found one cheap but in terrible condition, the aperture ring won’t turn and it’s warped. I had to carefully shape it back to make it work. If money is an important concern, the Nikkor 50mm f/1.8 Ai-S will be a good alternative, it is also tiny but not as compact as this one. It doesn’t have character and is a “pedestrian lens” by all standards. If you really want the 45mm focal length the GN-Nikkor 45mm f/2.8 Auto is another option but it turns the other way when focusing. It’s cheaper but the ones with the factory Ai-rings costs a bit more. It’s a Tessar-type lens so fans of the Tessar will love it. If you’re really considering buying the Nikkor 45mm f/2.8 Ai-P, make sure that you find the special hood and other accessories if you’re a collector. Without them, it has not much of a collector’s value. This one will stay in my collection, I love it a lot and I see myself using this quite often.
Before We Begin:
If this is your first attempt at repairing a lens then I suggest that you check my previous posts regarding screws & drivers, grease and other things. Also read what I wrote about the tools that you’ll need to fix your Nikkors.
I suggest that you read these primers before you begin (for beginners):
Reading these primers should lessen the chance of ruining your lens if you are a novice. Before opening up any lens, always look for other people who have done so in Youtube or the internet. Information is scarce, vague and scattered (that is why I started this) but you can still find some information if you search carefully.
I highly recommend that you read my working with helicoids post because this is very important and getting it wrong can ruin your day. If I can force you to read this, I would. It is that important!
For more advanced topics, you can read my fungus removal post as a start. This post has a lot of useful information and it will be beneficial for you to read this.
Disassembly (Main Barrel):
The barrel’s design is unique among Nikkors, it consists of several helicoids and a few gimmicks that are not normally implemented by Nikon. There’s a few electronic parts inside, too. It has to communicate with the camera and that enables this lens to give data to camera’s logic board, enabling it to stop this down properly in P and S modes. This is a complicated lens in terms of construction so I wouldn’t recommend this to amateurs. You may break this accidentally or the alignment of the helicoids could be off and you won’t be able to acquire accurate focus with it. Taking notes is of utmost importance and that will guide you through everything when it comes to reassembly. It has relatively few parts but that doesn’t mean that you should take it easy. If you are an experienced repairer then you should have acquired all the tools necessary for this job. Again, beginners should stay away from this lens.

Carefully extract these to remove the bayonet mount. Many people get stuck here because they’ve stripped the heads of these screws. These are not your standard screws but they’re JIS screws which will require special drivers. It is important that you use the right tools and techniques to remove these. If you haven’t seen my article on how to remove bayonet screws, read it so you won’t ruin these.
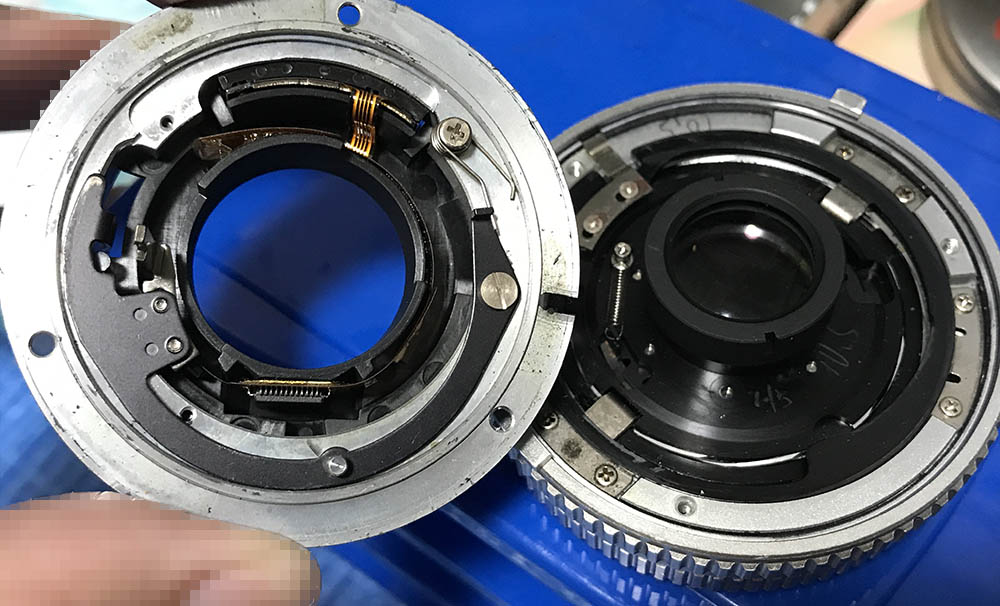
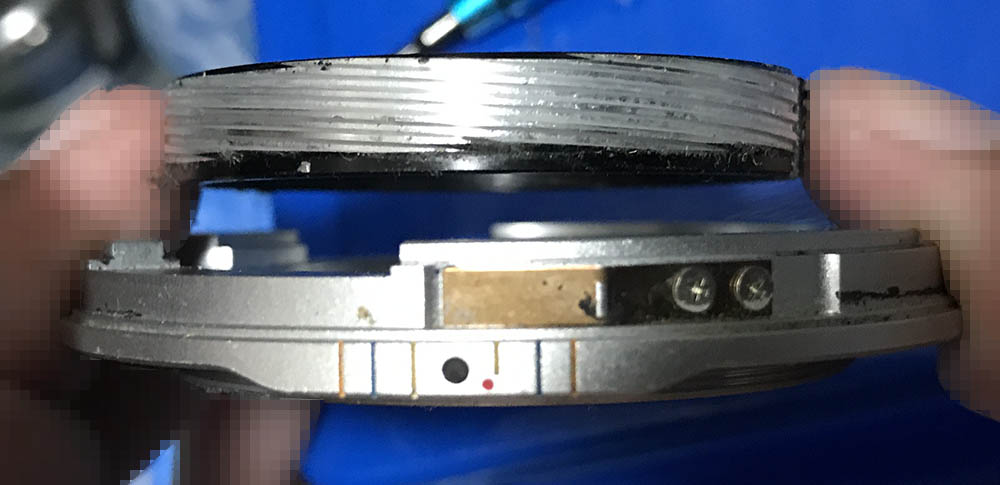
The bayonet mount can now be safely removed. Be careful not to harm the contacts and electronics on it. Discharge all static electricity before touching this. If you managed to damage these things then your lens will be bricked.

You don’t have to do this. Removing the contact block and the chips can be done by extracting these.

Carefully remove the electronics and set them aside. The only reason to do this to clean the bayonet mount thoroughly. There’s no reason for you to do this if your lens is working fine.
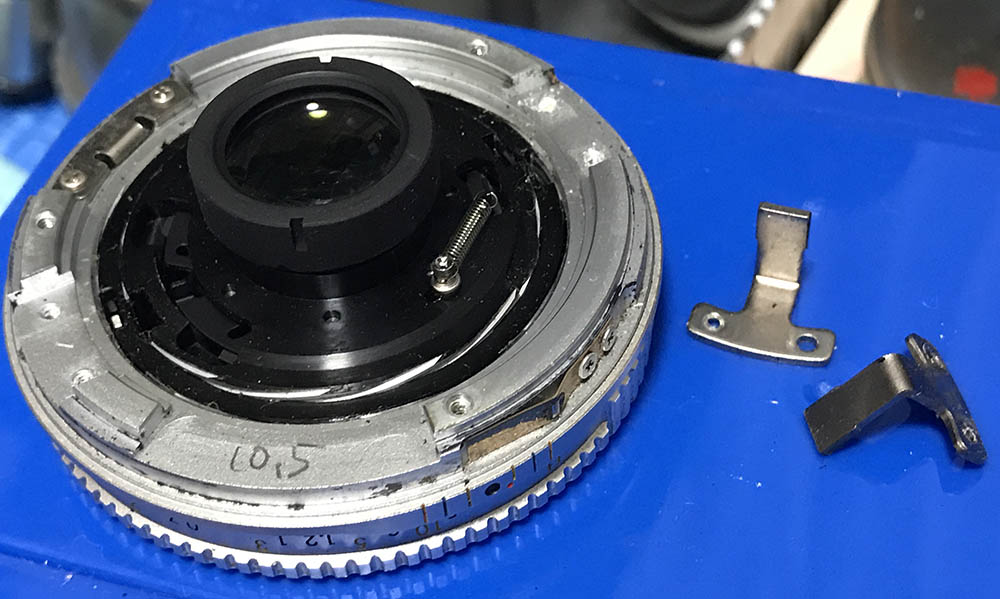
This is the regulator ring for the iris mechanism. Carefully remove it and do not warp it. Never remove the feeler-tab since it was adjusted at the factory.
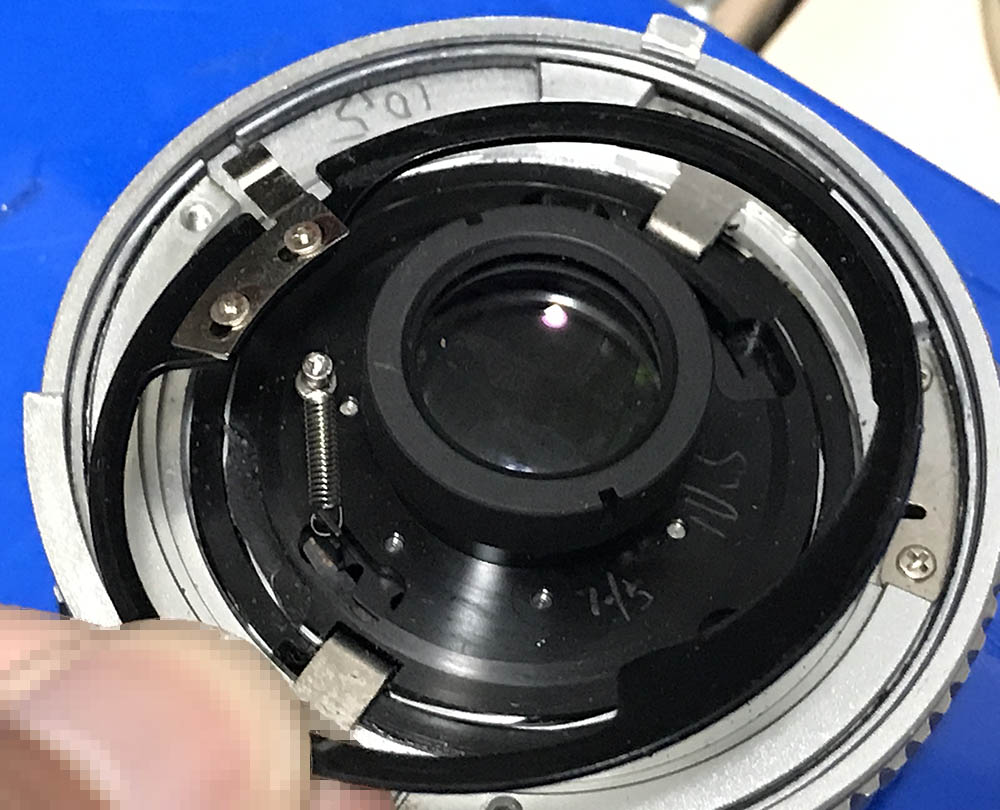
The aperture ring can now be removed.

This are the helicoid keys. They sync the turn rate of the helicoids, enabling you to extend or retract the barrel when you turn the focusing ring. Take a lot of notes and photos of everything here when the barrel is at infinity, it’s going to be handy later since you’ll know how things should align and how deep things should go. If you couldn’t reproduce it then you’ve gotten it all wrong. Extract these screws and you can remove the keys.
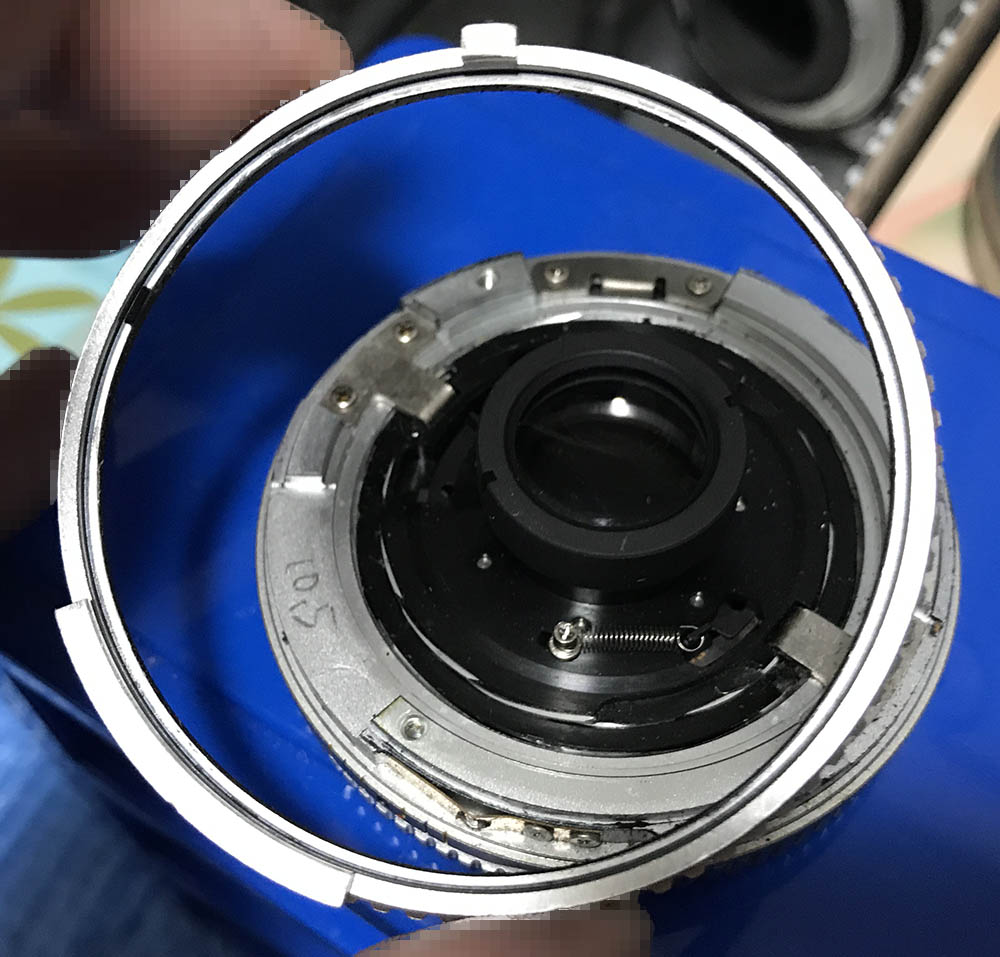
Don’t forget to mark one of the key and where it came from so you’ll know which one should go where.

Turn the inner helicoid until it separates from the barrel. Use a pen to mark where they separated because this is also the same place where they should mesh. If you forgot to do this then you’ll get stuck. If you don’t know how to do this, read my article on how to work with helicoids. Many people skip this important step so they get stuck.

Before removing this, make sure to mark both of its ends by making small, light scratches with a needle so you’ll know how to put this back again. This is a precision adjustment point and you don’t want to get this wrong or the lens won’t work properly.

You should also remove this thing.

Inspect everything before you separate the helicoids, this is how this should be at infinity.

Collapse it all-the-way and note the position of the infinity symbol. It should end up the same way later when you reassemble your lens.

Carefully separate the helicoids and don’t forget to mark where they parted.

This is a bit tricky. Mark the alignment of these parts before removing them. Make sure that the mark is small so you won’t damage it more than what is needed. This is a bit too-deep in my opinion.

Slowly separate these parts and be sure to mark where they separated.
Mine separated around this point.
Clean everything well and don’t leave any residue. Scrub the helicoids with a strong kitchen detergent and soak them in alcohol for some time after, it’s important that you clean and wipe it clean after so you won’t leave any old gunk on the helicoids and parts that will contaminate the fresh grease. I use a thicker-type of grease for this as that will give me ample resistance. This is not a wide lens but a damped focusing ring for this feels great. Don’t use the heaviest grease available to you as that will make this thing too-stiff to turn. Be careful when scrubbing the lettering as you don’t want to remove any of the painted lettering. A soft toothbrush should be used to scrub these.
Disassembly (Objective):
The objective is of conventional design but there are some differences that’s going to confuse even the experienced repairer. The objective’s housing has threads and is a part of the helicoid system so you’ll need to dismantle all of it just to clean the helicoid well. One problem that this lens can be prone to is the oily iris syndrome. The iris mechanism is close to the helicoids and it’s vulnerable to contamination from bard grease. This is something that you’ll have to be careful with when purchasing one of these.

The front optics assembly can be removed by unscrewing it off. It’s difficult to remove since it’s sealed with a thin strip of tape. Alcohol helps but it can be dangerous, too. Alcohol can reach the optics and damage it so be careful with it. Just apply a little at a time until you’re able to unscrew it. Use a soft rubber cup to remove this so you won’t damage it.

Well, there’s actually a secret. You can saturate the plastic bezel with a bit of alcohol to soften the tape and then pick on the bezel with your nail until it’s off. From there, you can remove the front optics assembly with a small lens opener.

Carefully extract these screws so you can remove the front barrel.

Separate the objective from the front barrel.

The rear group can be removed by unscrewing this collar. It’s easy to do, it can be unscrewed with your fingers. If it’s stuck you’ll have to apply a bit of alcohol to its threads and use a rubber band for extra grip.

The rear group can be easily removed with a lens sucker. Mark the leading edge with a marker, paint a dot on the wall and that’s enough. There’s a thin spacer underneath it, don’t forget to mark its leading edge, too. If any of the parts here were put back incorrectly you risk damaging the elements here. I am always careful of this since the damage cannot be repaired.

Before you remove the iris make sure to decouple this spring first.
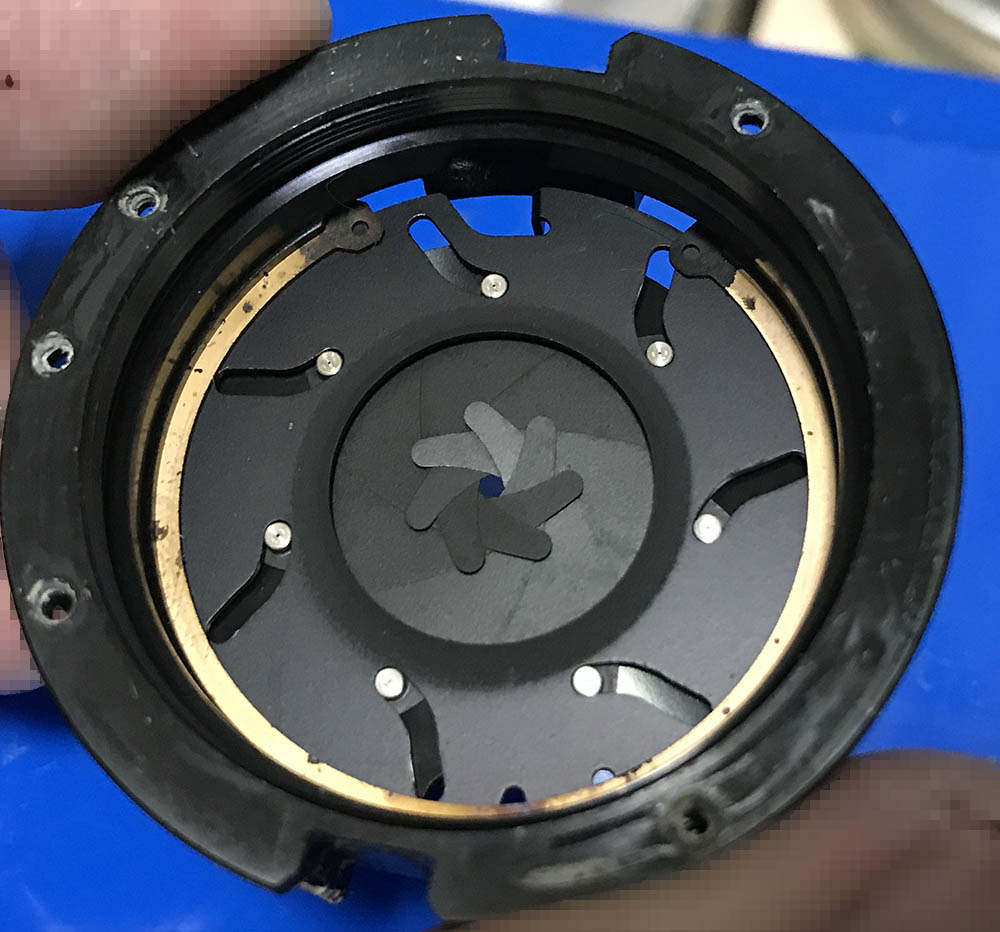
The iris is being held by this clip. Use a special opener to remove it and you can dismantle the iris completely.

Make sure not to warp it when you remove this from the housing.

The rotator plate can be removed next.
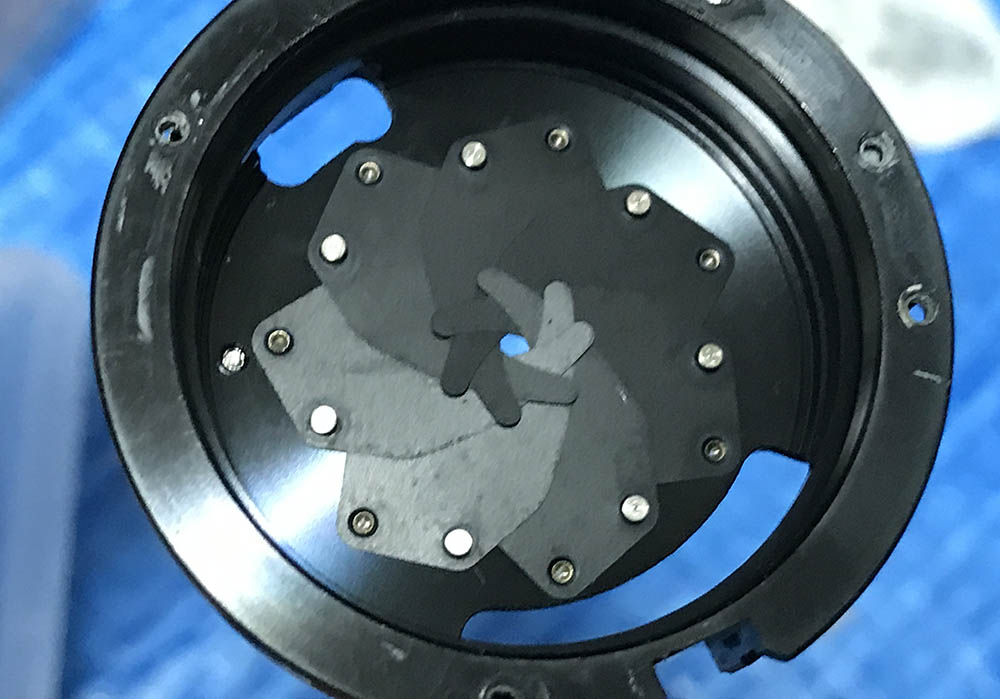
Here lies the iris, carefully remove the blades by dropping them into a pile of soft tissue to cushion the fall.

Clean everything well. The blades were wiped with naphtha and lens tissue. Only handle the blades by the thick ends with utmost care.
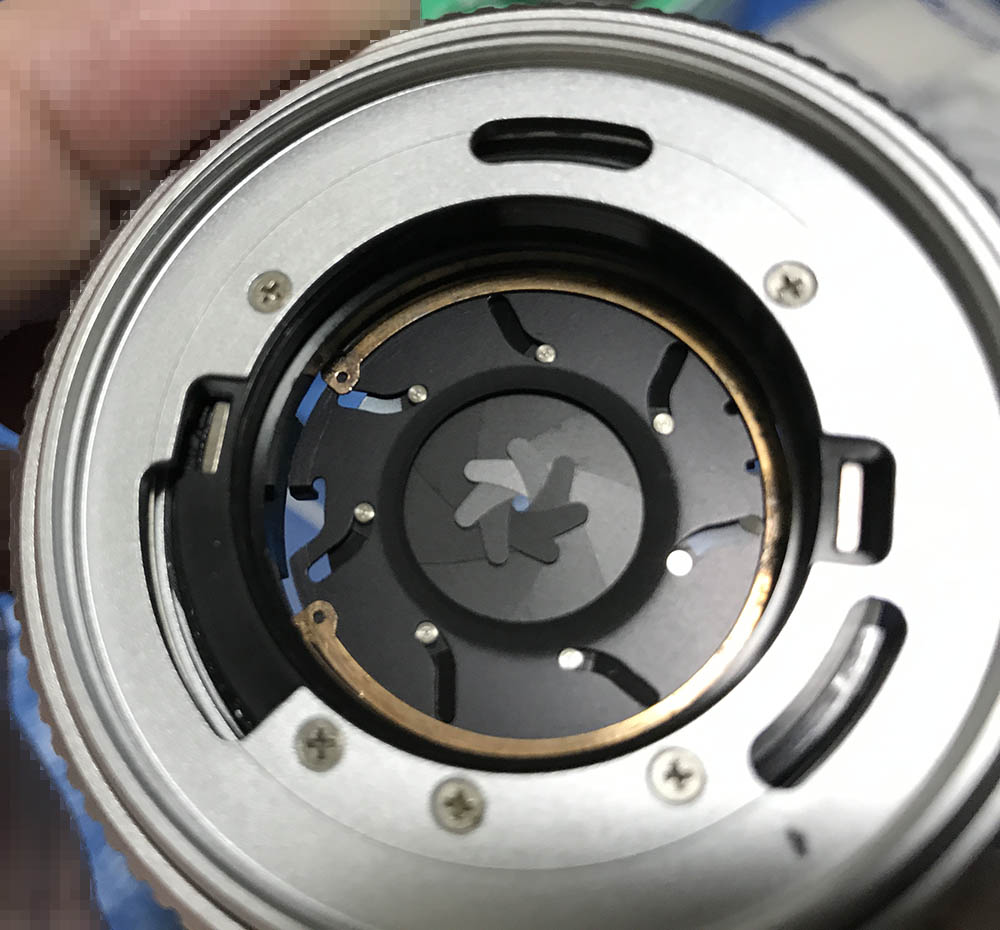
The iris is now super-clean! It’s worth all that trouble seeing it in this state.
For people who would prefer to watch videos, here’s something for you. It’s mostly for lenses with the oily iris problem but it’s worth watching even if your lens is clean.
Here’s our pal’s Kenneth’s video if you have the time, please subscribe to his channel. There are many interesting videos there.
It is mandatory to dismantle everything just so you could clean the housing since it’s part of the helicoid system. This is unfortunate but necessary so it could be made this thin. If your lens has fungus, read my article on cleaning fungus. Please dilute the solution so it won’t be too-strong and ruin the lens’ coating.
Conclusion:
This was an enjoyable project, I learned a lot from repairing this lens. It’s an interesting little lens with a lot of innovative features for a Nikkor. I wanted one for a long time and I finally got one. Despite being badly-damaged it’s a lucky find because I got this for not a lot of money.

Reassemble your lens back to this state and adjust its focus. If you have not seen my article on how to adjust your lens’ focus, read it and see how it can be done in a DIY setting.

Reinstall the bezel and use double-sided tape to secure it. Contact cement is a nice alternative but it can be too strong.
It’s now perfect! such a lovely lens, it will certainly attract a lot of attention for you from the opposite sex. Who says “bigger is better”? It’s how you can use your lens that matters the most and how you enjoy using it.
Thanks for following my work. If you liked this, please share this with your friends at social media. That will help me a lot since this site relies on clicks and views. You can also support this blog, that will help me offset the cost of maintenance. It also helps me purchase, develop and scan film. Since this is a site that promotes the use of film you are also helping the industry. Thank you very much for your support, see you again in the next article. Ric.
Help Support this Blog:
Maintaining this blog requires money to operate. If you think that this site has helped you or you want to show your support by helping with the site’s upkeep, you can make a small donation to my paypal.com (richardHaw888@gmail.com). Money is not my prime motivation for this blog and I believe that I have enough to run this but you can help me make this site (and the companion facebook page) grow.
Leave me some tip?
Thank you very much for your continued support!
$2.00
Helping support this site will ensure that this will be kept going as long as I have the time and energy for this. I would appreciate it if you just leave out your name or details like your country’s name or other information so that the donations will totally be anonymous. This is a labor of love and I intend to keep it that way for as long as I can. Ric.

Jul 12, 2020 @ 11:06:37
Charlton Heston…a bonafide classic. They used to show it on TV in the US. There are scenes (like parting of the Red Sea) in that movie that stick permanently in the mind. I did not know that there was an earlier version of the movie.
Great work on the 45 pancake! I’ve always wanted one but it has become a kind of collectors item.