Dutch Oliebollen

This post may contain affiliate links, meaning, at no additional cost to you, I will make a commission if you click through and make a purchase.
Dutch Oliebollen (roughly translated ‘Oil Balls’ or ‘Oil Spheres’) are also sometimes called Dutch Donuts or Dutch Dough Balls. The name may sound odd, but I can tell you that these balls are delicious! Eating Oliebollen is a tradition in The Netherlands. Every year on New Year’s Eve, there will be a tray of Oliebollen in most households in The Netherlands.
A Short History
According to the Dutch history site isgeschiedenis.nl the first Oliebollen were eaten by the Batavians and the Frisians at the start of this era. What started out as a flat ‘Oliekoek’ (Oil cake) evolved into the Oliebollen we know today. Since the 19th century the Oliebol became a traditional New Year’s Eve treat. Next to the Oliebol being a nutritious food in cold times, the treat became part of a custom in the late medieval times where, around New Year’s Eve, the poor were treated with a special flat wafer called “Kniepertje” or an Oil cake. The Dutch brought the Oliebol to North America which evolved into Donuts, except nobody remembers that so Oliebollen are sometimes referred to as Dutch Donuts, because everyone knows donuts.
How To Make Dutch Oliebollen
The original Oliebollen are without any filling, just plain fried dough balls. However, most people in the Netherlands will eat Oliebollen filled with currants and raisins (They’re called krentenbollen when you buy them at the Oliebollenkraam (Oliebollen Stall). I like adding some apple as well. My recipe includes raisins, apples and currants, but you can leave out if you just want a plain Oliebol. I have tried many recipes in search of the best Oliebol and my favorite is one from one of the master pastry baker of the Netherlands, Cees Holtkamp. I’ve only slightly adapted his recipe for my own Oliebollen.
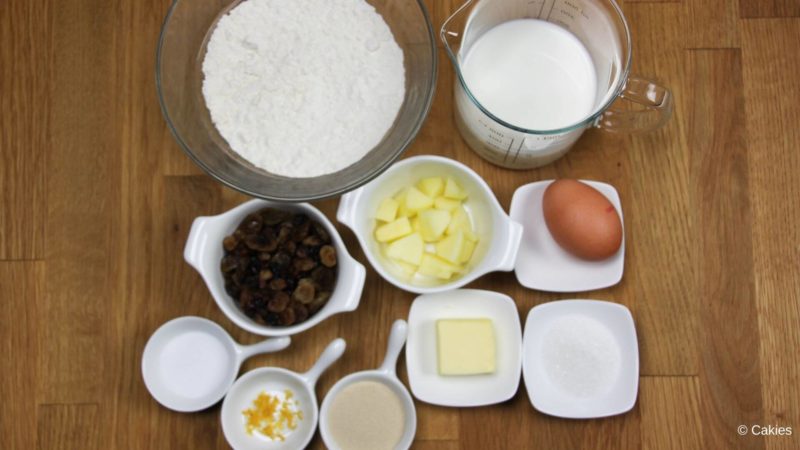
You’ll need flour, milk, egg, butter, sugar, salt, yeast, raisins, currants, apple. (a full list of ingredients including measurements can be found in the recipe card below).
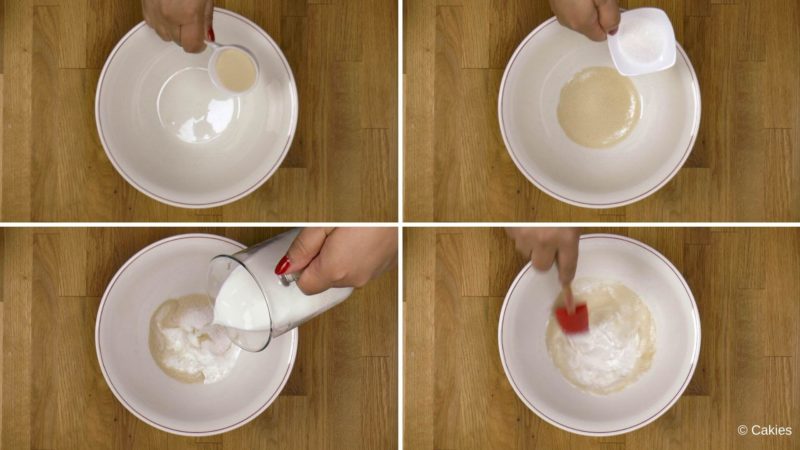
Start by adding yeast, sugar and 3/4 of the milk into a bowl and mix a little.

Next, add egg and flour and use a hand mixer with a dough hook to mix the batter. When a batter or dough starts to form add the lemon zest.

Continue mixing the batter while adding more milk a little bit at a time. When all the milk has been incorporated in the batter add the melted butter and salt.

Mix for a few more minutes till the butter and salt are fully incorporated till you have a nice smooth batter. Take out the hand mixer and add raisins, currants and apples to the batter.

Using a spatula, mix in the currants, raisins and apples till fully incorporated. Cover the bowl with a warm, damp cloth and leave for an hour in a warm place so the yeast can do it’s work and help the batter rise up. You should see the batter has increased in volume and there will be little bubbles in the batter.
If you don’t have a warm place for the batter to rest, preheat your oven to 95°F – 104°F (35°C – 40°C), once it reaches 104°F turn your oven off and you can put the bowl covered with the damp cloth into the oven. Make sure your oven is turned off after you’ve heated it. The batter shouldn’t bake, your oven should just be warm enough to help the batter rise.

When the batter is ready to fry, turn on your deep fryer to 356°F / 180°C or you can fry the Oliebollen in a deep pan on the stove, just make sure you check the temperature regularly to ensure consistency while frying the Oliebollen. Always use either sun flower oil or peanut oil for frying for the best result, don’t use the type of oil you use for fries because that will leave a white residue of fat on the Oliebol once it has cooled down. I always use sun flower oil. If you can’t use sun flower or peanut oil, you can use another type of neutral vegetable oil.
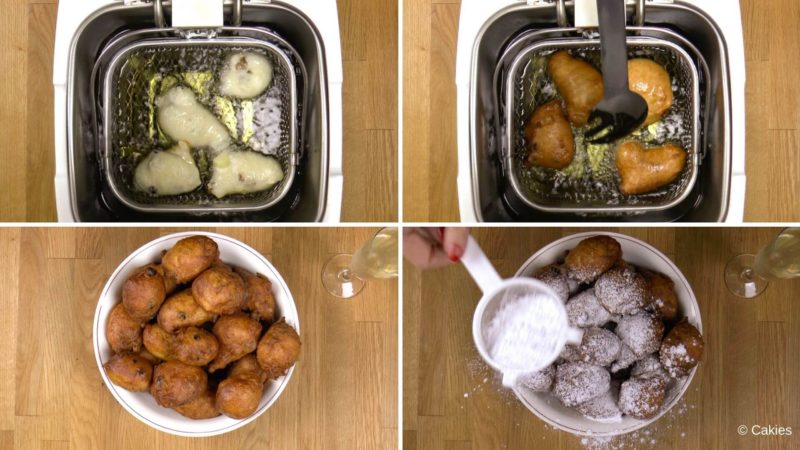
It’ll take roughly 5 minutes per batch to fry all the Oliebollen, make sure to turn over the Oliebollen halfway to ensure they’re cooked through fully. Some might turn over by themselves and some may need little help. When the Oliebollen are fully cooked and golden brown drain them on some paper towel.
Dutch Oliebollen can be eaten lukewarm or cold. They’re best when dusted with some confectioners’ sugar. If they’re still warm you might not want to dust a full serving bowl with Oliebollen though, because the sugar will melt, it’s best to dust them when they’re cooler. I usually dust the Oliebollen right before serving.
This recipes makes roughly 15 Oliebollen, depending on how you scoop your Oliebollen you’ll get a few more or a few less.
Oliebollen will stay good for a few days, make sure you cover them with clingfilm. If you find them a little tough or too cold, you can warm them up in the microwave or oven and they’ll be nice and soft again, make sure to eat them warm.
Dutch Oliebollen freeze well as well. Just add them to a Ziplock bag. Let them thaw in the bag and warm them up in the oven or microwave once thawed. Don’t heat them up too much, Oliebollen are best eaten lukewarm.


Recipe adapted from: Cees Holtkamp on FoodTube
 Recipe")
| Prep Time | 20 minutes |
| Cook Time | 30 minutes |
| Passive Time | 1 hour |
| Servings |
oliebollen |
- 3 teaspoons dry yeast 9 gram
- 1 tablespoon sugar 15 gram
- 1 cup lukewarm milk 250 milliliter
- 1 egg
- 2 cups all-purpose flour 250 gram
- 1/2 teaspoon lemon zest
- 1 1/2 tablespoon melted butter 20 gram
- 1/2 teaspoon salt 3 gram
- 1/3 cup raisins 50 gram - optional
- 1 1/2 tablespoon currants 10 gram - optional
- 1/4 piece apple (diced) 35 gram - optional
Ingredients
Batter
| |
- If you don't have a warm place to keep your batter, preheat the oven to 95°F - 104°F ( 35°C - 40°C. Turn the oven off when it gets to 104°F. The oven will act as a warm place for the batter to rest and help it rise.
- In a large bowl mix the 3/4 of the lukewarm milk with the yeast and sugar. (Make sure to use a bowl large enough for the batter to rise in without it overflowing)
- Add egg and flour and use a mixer with a dough hook to mix the batter. When the batter/dough starts to form, add the lemon zest and keep adding the rest of the lukewarm milk a little bit at a time while continuing to mix the batter. Keep mixing until you have a smooth batter.
- Add the melted butter and the salt and mix for a few more minutes till fully incorporated.
- Add raisins, currants, and apple to the batter and mix with a spatula till incorporated.
- Cover the bowl with a warm, damp cloth and put it aside in a warm place (or your preheated oven). Leave to rest for at least one hour.
- Once the batter has rested, take off the cloth and with a spatula, mix through the batter once.
- When the batter is almost ready to fry, turn on your deep fryer to 356°F / 180°C or you can fry the Oliebollen in a deep pan on the stove, just make sure you check the temperature regularly to ensure consistency while frying the Oliebollen.
- Dip with a metal ice-cream scoop into the hot oil, then scoop some of the batter with the ice-cream scoop and gently let the batter 'drop' in the hot oil. The batter will form immediately and float upwards. Depending on the size of your pan, you can fry several oliebollen at the same time. Just be careful not to overfill the pan. The oliebollen will expand a bit when they're in the oil and they need space to cook properly.
- Fry the oliebollen for about 5 minutes until golden brown and done, turning them halfway. Remove them from the oil and drain them in a dish covered with some paper towel or in a colander covered with paper towel.
- Serve the oliebollen lukewarm with some powdered sugar.
- If you feel the batter needs more time to rise, just leave it in the warm place for longer. If you keep it in the oven, make sure the oven still is warm enough for the batter. If needed you can increase the warmth to 122°F - 50°C max. Make sure you don't increase the warmth any higher.
- Always use either sun flower oil or peanut oil for frying for the best result, don't use the type of oil you use for fries because that will leave a white residue of fat on the Oliebol once it has cooled down. I always use sun flower oil. If you can't use sun flower or peanut oil, you can use another type of neutral vegetable oil.
- Oliebollen freeze well. Just add them to a Ziplock bag. Let them thaw in the bag and warm them up in the oven or microwave once thawed. Don't heat them up too much, Oliebollen are best eaten lukewarm.
Please note:
- Please note that the US cup measurements in this recipe are approximate and are not the exact equivalent of the grams mentioned in the recipe. Either use US cup measurements OR grams. I have added cups for those that prefer using cups. The recipe is most accurate using weights/metric measurements.
Hi, the translation is not really accurate.. 😀 Bollen in Dutch means “rolls”, as in bread rolls. A ball in Dutch is a “Bal”. If it were oil balls, it would be Olieballen. Big difference…imho. It is a very unappetizing translation, though i have seen it a lot. A more correct translation would be a donut or a Dutchie, or even deep-fried bread rolls.
I’ve used many variations myself, spheres, rolls, balls. In hindsight I wish I never translated it. haha, I used this version because it was recognized the most and Dutch dontus got too many negative reactions of fellow Dutchies. Maar ja, hoe je het ook noemt, een Oliebol blijft een Oliebol. Geen letterlijke vertaling nodig 😉
wanted to print this out but there’s a huge pic which will probably take up a good chunk of my ink. No option anywhere to not print the pic
Thanks for letting me know. I’m having my website guy take a look at it, because this should not be the case. There should only be a small photo visible.
These are not the original oliebollen. The don’t contain currants and apples 🙂
That’s why the filling is optional and I mention in the post that original Oliebollen are without any filling 😉
You mention the oliebollen as dutch donuts. One thing you got wrong there. The Dutch brought the oliebollen over to the america’s a long time ago and there they developed into the donut over time. So it is better to speak about the donut as being a dutch oliebol than the other way around. Give us Dutch a bit of credit for our food.
I know, I’m Dutch myself, that’s why I added a short line about it 😉
Turned out amazing, reminds me of the ones I used to eat at home. They were gone within the hour and had to make a double batch right away so our friends could enjoy them as well. Recipe was easy to follow and make (and that comes from a guy who doesn’t bake)
Thank you for sharing.
Perfect! I’m glad they turned out great!