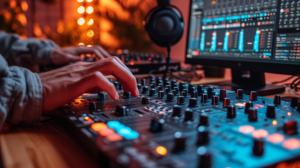
You’re minutes away from going live on your biggest DJ gig yet when suddenly you realize there’s no audio coming through your headphones or speakers.
Uh oh…equipment issues threaten to ruin your performance!Serato or Traktor
Troubleshooting sound problems on DJ controllers can be a headache, but having a systematic approach to tackle the most common audio gremlins will get the music pumping again in no time.
In this post, we’ll walk through diagnosing and fixing common DJ controller audio issues step-by-step. Let’s dive in…
How to Enable DJ Controller as Audio Interface

If your DJ controller is not outputting audio, the first thing to check is whether it is properly set as the audio interface in your DJ software.
The audio interface handles all routing of audio from the software to your speakers, headphones, recording devices, etc.
To set your controller as the audio interface, open the audio settings in your DJ software such as Serato or Traktor.
Look for an option to select the audio device or interface. You will likely see your controller listed here along with any other audio devices connected to your computer. Select your DJ controller as the preferred audio interface.
With this set, audio should now pass from the software through your controller and out to speakers, headphones or wherever else it is connected.
Be sure to disable any other audio devices in the settings so there are no conflicts. For example, you’ll want to mute or unselect your laptop’s internal soundcard. Having multiple audio interfaces enabled can cause issues.
Install Controller Drivers
If your DJ controller uses a direct USB connection to your computer, the proper drivers will need to be installed for the unit to function as an audio interface.
Most controllers include these drivers on a CD or make them available as a download from the manufacturer website.
Refer to the user manual for instructions on installing drivers on Windows, Mac or iOS systems. With the drivers installed, the controller should show up as a selectable audio device.
Enable Hardware Audio Interface
On some DJ controllers, there is a button or switch to enable the audio interface/soundcard functionality.
Consult your user manual to see if yours has such a feature. You may need to press this or flip the switch to “on” position to activate the audio routing.
If you’ve gone through all other troubleshooting with no results, check for a hardware switch before assuming issues with cables, software misconfiguration, etc.
Assuming your DJ controller is now correctly handling audio interface duties, let’s move on to the next steps in debugging your sound issues.
Checking Input Settings on DJ Controller

With your DJ controller set as the audio device, audio sources such as turntables, CD players, synthesizers etc should route through it.
However, you need to make sure inputs are properly configured to receive and route audio correctly. This involves setting input types and channel assignments.
Set Input Type
Most DJ controllers allow you to switch inputs between line and phono level. Line level is used for most audio sources like mixers, digital players, keyboards and so on.
But turntables output a phono level signal that requires extra amplification. So you’ll need to set inputs to phono that turntables are connected to.
Assign Channel Inputs
To assign inputs, use the settings in your DJ software or built-in controls on the hardware. Channel 1 input should match up to Deck 1, Channel 2 to Deck 2 and so on. If input 2 is assigned to deck 1 in software for instance, you won’t pick up the audio coming in. Take time to carefully match up software and hardware.
With the input type and channel assignments double checked, audio should now flow properly from your various sources through software and to master output. If you are still not hearing anything, there may be a loose connection on one of the inputs causing issues.
Adjusting Audio Buffer Size for DJ Controller

If your DJ controller is receiving audio from sources but it sounds delayed, choppy or out of sync, tweaking the audio buffer size may help.
The buffer size determines how much latency, or delay, is introduced to maintain stable audio playback.
A smaller buffer size reduces latency but can cause pops, clicks and distortion if set too low for your system’s capabilities. A higher buffer provides more stability at the cost of increased delay.
Finding the right balance is key.
Reduce Buffer Gradually
Start by incrementally reducing the buffer size in your DJ software’s audio settings. Try 128, 256 or 512 samples and listen for changes.
Keep lowering the buffer while monitoring for glitches and interrupted audio. Once you start to hear pops or max out your CPU, raise the buffer slightly to find a stable setting.
Aim for Low Latency
Aim for the lowest latency possible without performance issues. This allows tight syncing between audio sources like song beats matching up.
Some DJs can comfortably mix at 128 samples while others may need 256 or higher. There is no universal ideal buffer size – you have to test hardware/software limitations.
If adjusting buffer doesn’t fix sync, there could be an outdated firmware or software issue, covered next.
Updating Firmware and Software for DJ Controller

Outdated firmware on your DJ controller or a legacy version of DJ software can also cause latency and sync problems.
Controller manufacturers periodically release firmware updates that improve performance, fix bugs and optimize compatibility.
Download Latest Firmware
Go to the product page on your hardware maker’s website to download the latest firmware version.
Follow instructions to update the controller; this usually involves connecting to a computer via USB and running the update utility. Take care not to disconnect during the process which can brick the unit.
Update DJ Software
Updating DJ software is also important. Developers constantly refine code, enhance features and improve stability. New versions better support controllers and audio interfaces.
Go to the developer website and download/install software updates when available.
Keeping both controller firmware and DJ software up to date improves functionality and avoids a whole host of audio issues.
If experiencing latency or sync problems, updating should be one of the first troubleshooting steps.
Testing Headphones Output on DJ Controller

So your DJ controller seems properly configured as the audio interface and input settings check out okay. Audio plays through your speakers but not your headphones. This points to a potential hardware problem.
Isolate Headphones Issue
To isolate the issue, first plug your headphones directly into the controller rather than through an amp, mixer or splitter.
Listen for audio. If the headphones now work, there is likely a faulty connection or volume control problem on the amp/mixer side. Check connections and adjust mixer levels to resolve.
However, if the headphones are still silent through the controller output, the problem lies with the hardware itself.
The headphone jack may be malfunctioning or audio circuit damaged. Contact the manufacturer to troubleshoot further and inquire about repair or replacement options.
Thoroughly testing the headphone output in this manner helps determine if the problem is limited to the speakers or indicative of larger hardware faults.
If audio plays through speakers but not headphones, take time to isolate the issue before tackling other variables.
Further Hardware Troubleshooting for DJ Controller

If you’ve tried all of the above tips to no avail, there may be a more serious hardware malfunction in your DJ controller.
Some things to look out for include:
- Loose/damaged ports – wiggle cables to check for faulty inputs/outputs
- Bent pins on connections – inspect closely under light
Check for Physical Damage
- Physical damage to circuits – look for any burnt/melted components
- Power delivery issues – try different power cables/adapters
- Faulty soundcard – rule out drivers, may need professional repair
Reflow Solder Joints
- Bad solder joints – reflowing joints may fix intermittent problems
- Effects of spills/moisture – residue can cause short circuiting
Ensure Proper Cooling
- Overheating – ensure adequate ventilation and cooling
- Bad capacitors – can distort audio; visual swelling/leaking
Rule Out Interference
- Interference from cell phones or unshielded cables
If you suspect any of the above hardware issues, contacting the manufacturer for warranty service is recommended.
Some problems like overheating may be user-correctable, but deeper component-level faults usually require professional repair.
Contacting Support When DJ Controller Issues Persist

If you have thoroughly tried all troubleshooting steps and your DJ controller still has no audio, it’s time to seek assistance.
First check the hardware and software manuals in case you missed anything. User errors can easily be overlooked when frustrated by technical problems.
Barring simple mistakes, reach out to the manufacturer’s support team by phone or email. Explain the issue in detail and what steps you’ve taken so far.
Support agents can provide specialized troubleshooting tips or make arrangements for repair if needed.
Some companies also offer user forums which are handy for getting peer advice. Fellow users may have encountered and solved the same problem, often more easily than official channels.
With persistence and support, even the most stubborn audio issues plaguing a DJ controller can usually be resolved.
Don’t immediately give up on the hardware if sound problems arise. Careful troubleshooting will have the music playing again in no time.
Conclusion
Troubleshooting audio issues on a DJ controller can be frustrating, but a methodical, step-by-step approach will usually uncover the problem.
Start with software settings and work your way to hardware. Update firmware and software, test headphones output, and inspect components.
Seek user forums and manufacturer support if needed. With patience and persistence, you can get the music pumping again.
Don’t abandon your controller at the first sign of trouble – a few troubleshooting tips can have you mixing seamlessly once more. Keep the party going and overcome those audio gremlins.
Your next epic DJ set awaits!